
Excel has long been a primary tool for data formatting and reporting. The straightforward software program is simple to navigate and allows users to make numerous changes to tidy up and standardize a file’s format with ease. Although Excel is an outstanding tool, it is limited to editing only one file at a time, which can develop into a compounded issue as the number of files increase. While making basic changes to one file may take only a few minutes, making these same changes across 50 other files grows cumbersome quickly, leaving much to be desired from Excel.
Excel Reporting Solutions from Sea Cliff Consulting
Sea Cliff Consulting provides clients with solutions that automate repetitive tasks, freeing people to dedicate saved time to higher value work. In particular, Sea Cliff has created several Alteryx Macros to help streamline some of the most common formatting changes for Excel report files. Incorporating any of the Alteryx Macros from Sea Cliff allows a user to make all of the necessary changes in bulk without ever needing to fire up Excel.
The Process
Follow the steps below to incorporate Sea Cliff’s macros and simplify your reporting cycle.
1.Download Alteryx Macros
Start by downloading the Excel Protect, Column Width, and Cell Cleaner Alteryx Macros in the package from Sea Cliff available here. Here is a breakdown of how each macro works:
- Excel Protect: This macro locks specified columns and all sheet names from being editable. This feature is ideal for data entry, giving the user limited access to update certain columns only and locking everything else.
- Excel Column Width: This macro grants the ability to adjust the column width of specified columns. This tool is particularly useful when paired with the Excel Protection macro, which prevents additional formatting changes from being made, retaining the formatting before submitting the file.
- Excel Cell Cleaner: This macro verifies that values are shown as numbers versus strings and properly displays formulas in Excel.
2. Add the Location of the Macros to Your Saved Macro Path
After downloading the new macros, add the location of the macros to your saved macro path by accessing the “Macros” tab under Alteryx’s “User Settings.” Find more details about saving macros by viewing Alteryx’s instructional page available here.

3. Setting Up Your Macros
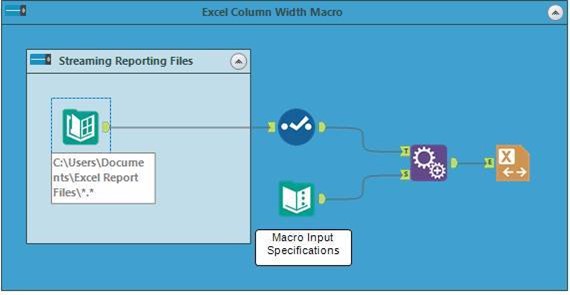
To run the macros successfully, make sure you open Alteryx in admin mode. Configure your workflow based on the Column Width Macro example below to set up the new macros properly. The example follows these steps:
- Use the Directory Macro — downloaded from CrEW here — to stream in the reporting files by pointing to the file directory of the report files.
- Use the Select Tool to de-select all fields except for “FullPath,” which is the only field needed for the next part of the process.
- Use the Text Input Tool to configure the parameters for the macro.
- Enter all of the sheet names that have columns with widths that need adjustment.
- Enter all of the columns that need width adjustment. These columns can be listed either one at a time (e.g. “A,” “B,” “C”) or as ranges (e.g. “A:C”).
- Enter the desired column width value.
- Use the Append Fields Tool to append the configurations just created to each file in the folder. Each column width adjustment will apply to all files automatically.
- Use the Excel Column Width Macro to select all the proper columns just created in each of the drop-downs.
The workflow is now set to run. Make sure none of the reporting files are open to avoid receiving an error message. Once the workflow completes, the files in the directory should all be updated.
To learn more about how to configure and customize your Alteryx workflow and to streamline your next reporting cycle, connect with Sea Cliff Consulting on LinkedIn.